Configuration and Launch
Your camera driver works perfectly — with a hardcoded resolution of 640×480, frame rate of 30fps, and exposure set to auto. But what if someone wants 1920×1080 at 60fps? Or a different camera model with different parameters?
Hardcoding configuration is brittle. Configuration files and launch systems make robot software adaptable and reusable.
Why Configuration Files?
Configuration files separate what your code does from how it's configured. This means:
- No recompilation — change camera resolution without rebuilding
- Environment-specific configs — different settings for sim vs. real robot
- Reusability — same code, different robots
- Version control — config changes are tracked like code changes
# config/camera.yaml
camera:
  device: "/dev/video0"
  resolution:
    width: 1920
    height: 1080
  frame_rate: 60
  exposure: auto
  white_balance: 5500  # Kelvin

detection:
  confidence_threshold: 0.75
  model: "yolov8n.pt"
  labels: ["person", "car", "ball"]
Your code loads this at runtime:
import yaml

with open("config/camera.yaml") as f:
    config = yaml.safe_load(f)

# Access nested values
width = config["camera"]["resolution"]["width"]  # 1920
threshold = config["detection"]["confidence_threshold"]  # 0.75

# Now initialize your driver with these values
camera = CameraDriver(
    device=config["camera"]["device"],
    width=width,
    height=config["camera"]["resolution"]["height"],
    fps=config["camera"]["frame_rate"]
)Always validate configuration! Use schema validation libraries (like jsonschema for Python, serde for Rust) to catch typos and invalid values early. A config file with frame_rate: "sixty" (string instead of int) should fail immediately, not crash your robot later.
YAML vs. TOML vs. JSON
Different robotics ecosystems prefer different formats:
| Format | Syntax | Pros | Cons | Used In |
|---|---|---|---|---|
| YAML | Indentation-based | Human-friendly, concise | Whitespace-sensitive, ambiguous syntax | Many robotics frameworks |
| TOML | INI-like | Clear, explicit | More verbose | Rust ecosystem |
| JSON | JavaScript-like | Strict, universal | No comments, verbose | Web APIs, URDF alternatives |
YAML example:
robot:
  name: "mybot"
  wheels: 4
TOML example:
[robot]
name = "mybot"
wheels = 4
JSON example:
{
  "robot": {
    "name": "mybot",
    "wheels": 4
  }
}
For robotics, YAML is the most common format. TOML is gaining traction in Rust-based systems (it's Cargo's native format).
Launch Systems
Real robots run dozens of nodes at once: camera drivers, sensor processors, planners, controllers, visualizers. Starting each manually is tedious and error-prone.
Launch systems orchestrate multiple nodes with a single command.
<launch>
  <!-- Camera driver -->
  <node pkg="my_camera_driver" exec="camera_node" name="camera">
    <param name="config_file" value="$(find-pkg-share my_camera_driver)/config/camera.yaml"/>
  </node>

  <!-- Object detector -->
  <node pkg="object_detector" exec="detector_node" name="detector">
    <remap from="image" to="/camera/image_raw"/>
    <param name="model" value="yolov8n.pt"/>
  </node>

  <!-- Visualization -->
  <node pkg="rqt_image_view" exec="rqt_image_view" name="viewer">
    <remap from="image" to="/detector/annotated_image"/>
  </node>
</launch>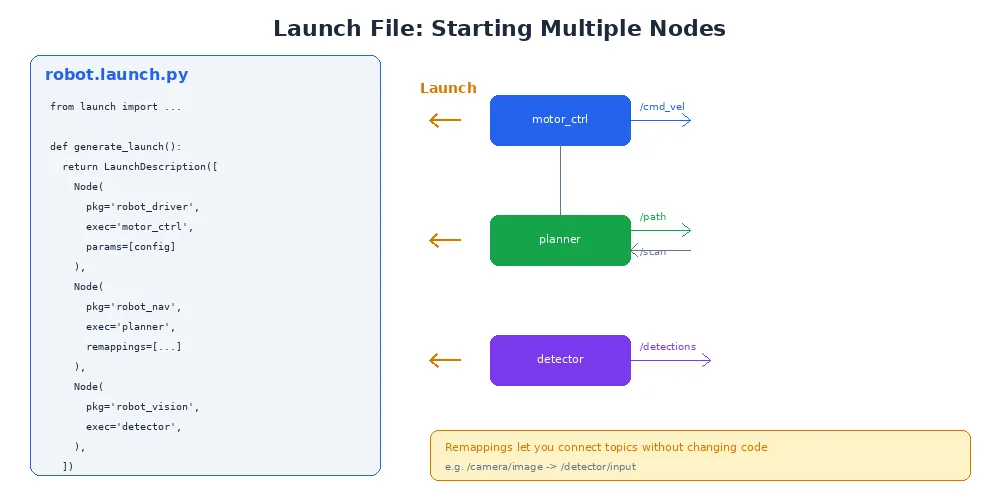
This single file:
- Starts three nodes
- Loads the camera config file
- Remaps topics so detector subscribes to camera
- Passes parameters to each node
Run it with a single command:
launch my_package camera_system.launch.xmlUse launch files for reproducibility. Instead of "start these five nodes in this order with these flags," you have a single versioned file. New team members can run your entire system with one command.
Environment-Specific Configurations
You often need different configs for different environments:
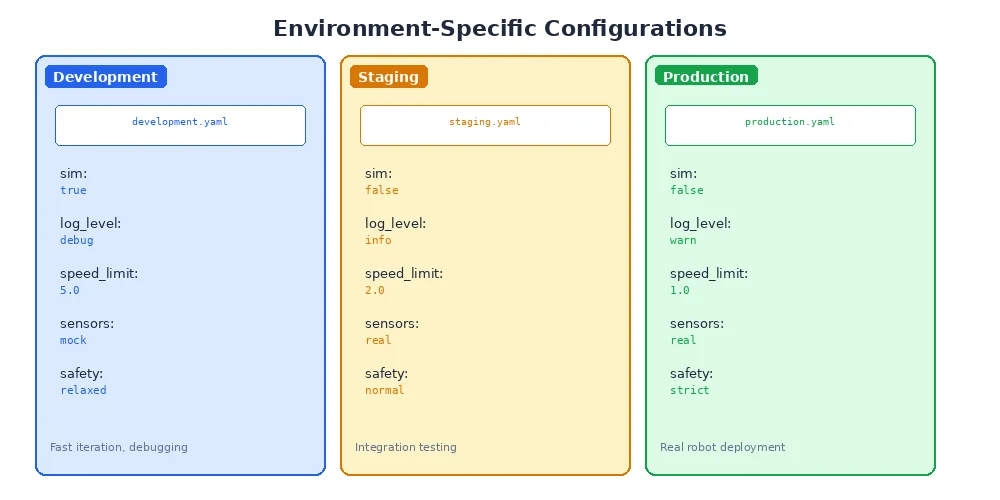
Your launch file selects the right one:
from launch import LaunchDescription
from launch.substitutions import LaunchConfiguration

def generate_launch_description():
    env = LaunchConfiguration('env', default='real')

    return LaunchDescription([
        DeclareLaunchArgument('env', default_value='real',
                             description='Environment: sim, real, or test'),

        Node(
            package='my_camera_driver',
            executable='camera_node',
            parameters=[f'config/{env}.yaml']
        )
    ])
Run with:
launch my_package camera.launch.py env:=sim   # Use sim.yaml
launch my_package camera.launch.py env:=real  # Use real.yaml
What's Next?
You've packaged your code and made it configurable. But how do you know it actually works? How do you prevent bugs from creeping in as you add features? In the next lesson, we'll explore testing robot software — from unit tests to full system simulations.