Your First System
We've covered sensors, actuators, and the modular software architecture that connects them. Now let's put it all together. We'll design a simple robot system from scratch and trace exactly how information flows through it.
The Mission
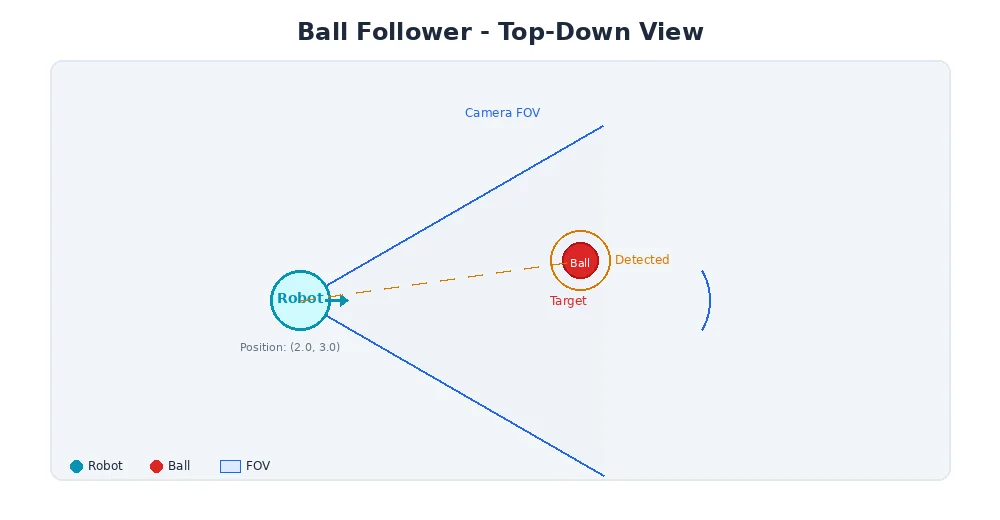
Our robot needs to do one thing: drive toward a red ball.
Simple enough, right? But even this basic task requires multiple components working together. Let's design the system.
Step 1: Define the Hardware
Our robot has:
- 1 RGB camera (640×480, 30 fps) — to see the ball
- 2 DC motors with encoders — left and right wheel (differential drive)
- 1 microcontroller — runs the software
That's it. Minimal hardware, maximum learning.
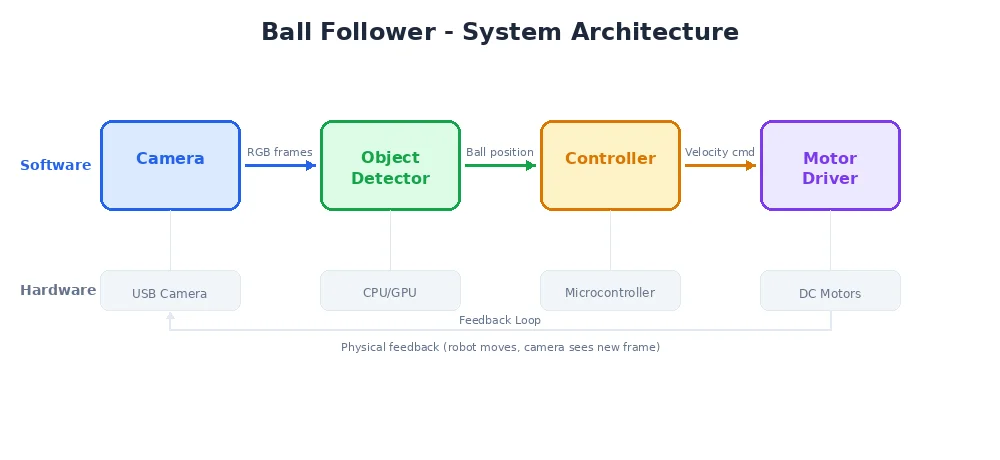
Step 2: Design the Nodes
Following the modular approach from the last lesson, we need:
| Node | Input | Output | Job |
|---|---|---|---|
| Camera Driver | Hardware | Image on /camera/rgb | Read frames from the camera |
| Ball Detector | Image from /camera/rgb | BallPosition on /perception/ball | Find the red ball in the image |
| Controller | BallPosition from /perception/ball | Twist on /cmd_vel | Decide how to steer |
| Motor Driver | Twist from /cmd_vel | Hardware | Send voltage to motors |
Four nodes, three topics, one mission.
Step 3: Trace the Data Flow
Let's follow one cycle of the sense-think-act loop:
1. Camera Driver publishes an image
Every 33ms (30 fps), the camera driver reads a frame and publishes it:
class CameraNode:
    def __init__(self):
        self.publisher = create_publisher("Image", "/camera/rgb")
        self.camera = Camera(width=640, height=480)

    def run(self):
        while True:
            frame = self.camera.capture()  # 640x480x3 = 921,600 bytes
            self.publisher.publish(frame)
            sleep(0.033)  # ~30 Hz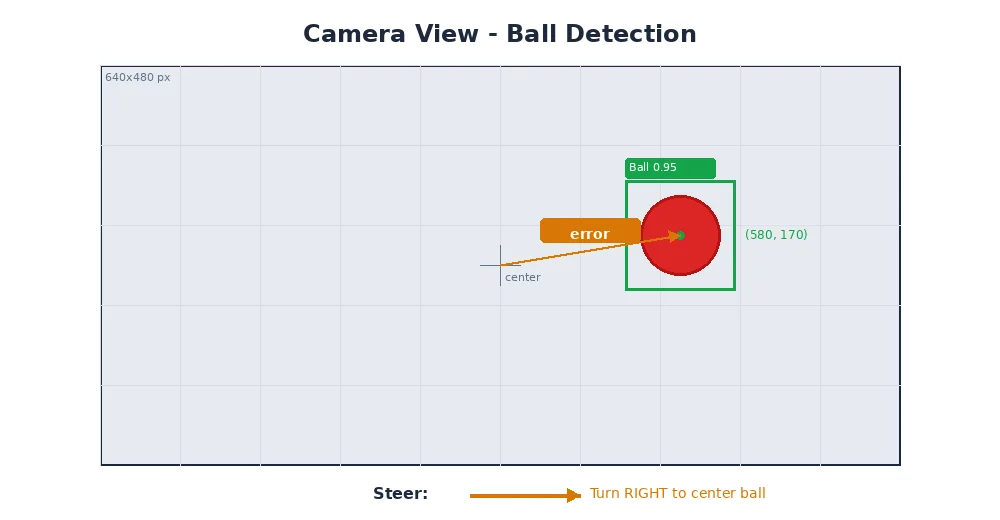
2. Ball Detector finds the red ball
The detector subscribes to images and looks for red pixels:
class BallDetectorNode:
    def __init__(self):
        self.subscriber = create_subscriber("Image", "/camera/rgb", self.on_image)
        self.publisher = create_publisher("BallPosition", "/perception/ball")

    def on_image(self, image):
        # Convert to HSV color space
        hsv = rgb_to_hsv(image)

        # Threshold for red color
        mask = threshold(hsv, low_red, high_red)

        # Find the largest red blob
        contours = find_contours(mask)
        if contours:
            largest = max(contours, key=area)
            cx, cy = center(largest)
            radius = equivalent_radius(largest)

            self.publisher.publish(BallPosition(
                x=cx,           # pixel x (0-640)
                y=cy,           # pixel y (0-480)
                radius=radius,  # apparent size
                found=True
            ))
3. Controller decides the steering
The controller uses a simple rule: if the ball is left of center, turn left. If right, turn right. Drive forward proportionally to the ball's apparent size (bigger = closer = slow down).
class ControllerNode:
    def __init__(self):
        self.subscriber = create_subscriber(
            "BallPosition", "/perception/ball", self.on_ball
        )
        self.publisher = create_publisher("Twist", "/cmd_vel")
        self.image_center_x = 320  # half of 640

    def on_ball(self, ball):
        if not ball.found:
            # No ball seen — stop and spin to search
            self.publisher.publish(Twist(linear_x=0.0, angular_z=0.3))
            return

        # Steering: proportional to how far off-center the ball is
        error = (ball.x - self.image_center_x) / self.image_center_x  # -1 to 1
        angular_z = -0.5 * error  # turn toward the ball

        # Speed: slow down as we get closer (ball appears larger)
        linear_x = max(0.1, 0.5 - ball.radius / 100.0)

        self.publisher.publish(Twist(
            linear_x=linear_x,   # forward speed
            angular_z=angular_z  # turning speed
        ))
4. Motor Driver moves the wheels
The motor driver converts the Twist command into individual wheel speeds:
class MotorDriverNode:
    def __init__(self):
        self.subscriber = create_subscriber("Twist", "/cmd_vel", self.on_cmd)
        self.left_motor = Motor(pin=1)
        self.right_motor = Motor(pin=2)
        self.wheel_base = 0.3  # 30cm between wheels

    def on_cmd(self, twist):
        # Differential drive kinematics
        left_speed = twist.linear_x - twist.angular_z * self.wheel_base / 2
        right_speed = twist.linear_x + twist.angular_z * self.wheel_base / 2

        self.left_motor.set_speed(left_speed)
        self.right_motor.set_speed(right_speed)
The Complete Picture
Here's the full data flow in one cycle:
Camera (hardware)
    ↓ capture
Camera Node
    ↓ publishes Image to /camera/rgb
Ball Detector Node
    ↓ processes image, finds ball at pixel (420, 300)
    ↓ publishes BallPosition to /perception/ball
Controller Node
    ↓ ball is right of center → steer left
    ↓ publishes Twist(linear=0.4, angular=0.15) to /cmd_vel
Motor Driver Node
    ↓ converts to wheel speeds: left=0.377, right=0.423
Left Motor + Right Motor (hardware)
    → robot curves to the right toward the ball
This entire cycle takes about 40-50 milliseconds. The robot updates its behavior 20-30 times per second — fast enough to smoothly track a moving ball.
Notice how each node only knows about its own inputs and outputs. The camera node doesn't know about balls. The ball detector doesn't know about motors. This separation of concerns is what makes the system maintainable and extensible.

What Could Go Wrong?
Real robots encounter real problems:
- The ball moves behind an obstacle → The detector publishes
found=False, the controller switches to search mode - The camera feed is delayed → The controller acts on stale data, possibly overshooting the turn
- A motor stalls → The robot drives in a curve even though it commanded straight
- Another red object appears → The detector might track the wrong thing
Each of these problems has solutions — better algorithms, sensor fusion, error handling — that we'll explore in later modules.
Why This Matters
This tiny ball-following robot uses the exact same architecture as self-driving cars, warehouse robots, and Mars rovers. The nodes are more complex, the sensors are more numerous, and the algorithms are more sophisticated — but the pattern is identical:
Sense → Process → Decide → Act → Repeat
What's Next?
Congratulations! You've just designed your first robot system. You understand sensors, actuators, modular software architecture, and data flow. In Module 2, we'll dive deeper into how parts communicate — the publish-subscribe pattern, message types, and what happens when things need to talk in real-time.